X
X Windows is a standard which has been used on UNIX systems for years, to provide graphical functionality. An "X Server" provides the basic drawing functionality, a "Window Manager" positions things inside it (A bit like a Shell under Windows, with AstonShell or LiteStep as alternatives to Explorer), and "X Clients" (programs) connect to this server and ask to be drawn. Of course, you don't really need to know all of this, except to know that you need an X server, a window manager, and some apps. We're going to tackle the first part of this first, so as root, apt-get install x-window-system. This is a pretty big package, so whilst that's downloading, use your other terminals to annoy people on IRC, surf the net, and listen to music.The X server currently used on Debian, XFree86, is something of an ageing dinosaur. Angered by a number of policy decisions by the XFree86 team, a number of groups took it upon themselves to take the XFree86 source code, and create their own version of X based upon it - but looking to modern facilities such as friendly hardware detection. The replacement system, XOrg, is currently not available in Debian, but there are plans to replace XFree86 once the XOrg code has been cleaned up. Some of the technologies currently being experimented with will provide swishy OpenGL-accelerated graphics, much like Apple's OS X.
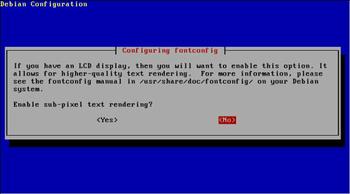
Until then, we need to make do with XFree86 - with its arcane settings and fragile configuration. Let's get started! By now, you should have the first configuration setting being asked of you by your apt-get install:

Pick whichever setting applies to you here - I have a TFT, so Yes is right for me. This is equivalent to the "cleartype" option in Windows. The next screen asks if an autodetect should be attempted. Cross your fingers, and hit Yes - it should pick the right driver for your graphics card, such as nv, ati (or in this case vmware). The next setting relates to keyboard input - just pick the default. A dialog box will inform you of the different types of keyboard - hit enter, and choose a keyboard type - you will very probably have pc104. More keyboard configuration, this time for the keyboard layout. Pick the two-letter code which matches your keyboard, such as us or gb. The next screen informs you that it needs another keyboard setting - leave this blank. The next two screens ask almost identical questions. Just hit enter through these as well.
At last, some mouse settings. You have to select your mouse port at this point - it's important to pick the right setting. /dev/input/mice is correct if you have an USB mouse, /dev/psaux for a PS/2 mouse. If you pick PS/2, you'll want to select a mouse of type ExplorerPS/2. You'll be asked again whether you use a TFT, then asked to do some configuration of refresh rates and resolutions. Pick Medium on the next screen for an easier setup, then scroll through the list to pick your monitor's best capability - 1024x768 @ 75Hz on my display. The next screen allows you to select which resolutions to allow XFree86 to use - scroll up and down the list selecting the ones you want to allow with the space bar to mark them, then press tab to highlight OK and press Enter when done. The next screen introduces you to picking a colour depth for your system - 24 bit under XFree86 is the same as 32 bit under Windows, so just go with that, unless you have a pressing need not to (such as an antique graphics card).
And we're done. X server, check. What's next? A Window Manager.


