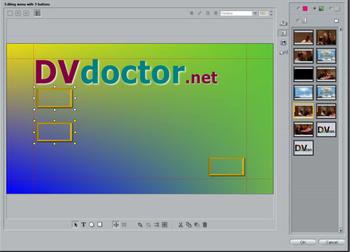
Menu creation in TitleDeko
TitleDeko has a large canvas on which the title is assembled and, to its right, there's a graphic clip bin for the text and media files used for title and menu construction. Even when TitleDeko is launched via the menu options, the project is initially treated as a title. However, when buttons are added, it's recognised as a menu.There are four stacked tabs on the left of TitleDeko's bin for accessing text styles, backgrounds, graphics and buttons. Before placing any text or buttons, make sure to put a background in place. To do that, click on the background icon – the one that, for reasons we daren't guess, is a cactus plant.

There are four main options for the background - as a plain colour, a colour gradient, a transparent background or an image (still or moving). If using a video file as the background, select the last thumbnail at the bottom of the bin, and then click the small folder icon up at top right to open a browser to locate an appropriate video file.
Before starting to search, ensure that the browser’s drop-down File-type selector is not set only to show a particular type of still image. Depending on which type of video you’re hunting down, choose, instead, All Files or AVI or MPEG.
After you open any file in a folder, the folder's entire contents appear in Studio's clip bin as thumbnails in place of the default set of static backgrounds.
When Studio adds the chosen video file to the timeline, it automatically shortens it to 30 seconds' duration – starting from the beginning. If the part you want to show comes after that, then you need to pre-prepare a shortened version containing just the required footage, then bring this in.


