Making buttons & adding chapters
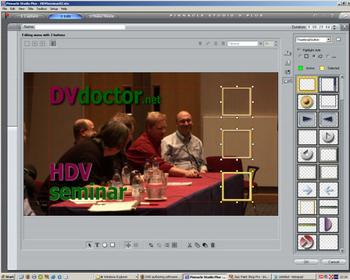
Although there's a good spread of ready-made button styles for different purposes, text or graphic elements used in the TitleDeko composition can be turned into buttons. Just highlight the element on the canvas, click on the Buttons icon and then set the drop-down menu at the top of the clip bin to the type of button required – Previous Button or Next Button (used to navigate between menus); Thumbnail; and Normal.
and text or graphic elements can be turned into buttons, too
Above the button menu is a choice of highlight colours for active and selected states. Clicking once on the highlight colour opens a colour picker, allowing different hues to be selected. Above the highlight colours there's a choice of highlight styles – for highlighting the whole button, the border only, or underlining it in selected or active states.
Save the TitleDeko project from Studio’s File menu, and close it by pressing F12 or clicking the close-window X icon at the top of the canvas. This brings Studio back into the foreground and the finished menu will now be on the timeline at the place where the scrubbing bar had been positioned.
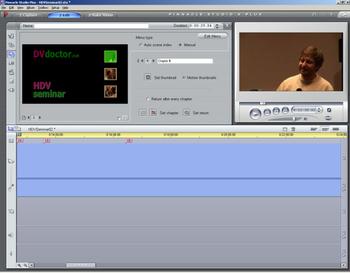
Next, dive back into the Menu editor in Studio’s video toolbox and start linking videos and chapters to the menu’s buttons. If you've already added chapter marks to the video clips sitting on the timeline, the program should have created links in the menu that's just been made.

Clicking on the small box marked C1 adds chapter numbers to each button – giving a good visual guide as to how buttons and chapters link to one another. Clicking the check box with a film-clip icon animates the thumbnails, turning them into small video loops. Any accompanying text for the button is entered in a small text field in the toolbox.
If chapters aren’t already set, there are two main ways to set them. One is to drag the play bar to the points at which chapter markers are to be set, right click on the menu track and select Set Disc Chapter. The chapter points are then automatically added to the preceding menu. Alternatively, there are buttons within the toolbox’s Menu Editor for setting or clearing chapter markers.
Another button in the Menu Editor allows the frame (or video starting point) for the thumbnail to be selected. One further button adds a Return-to-Menu marker, which is normally only used at the end of a DVD's last chapter.
The video toolbox provides options to change the hue, saturation, brightness and contrast of background video – useful if buttons don’t stand out well enough – but these changes need to be made to the video on its own, rather than within the menu-editing process.


