Using the Windows Recovery Console
Introduction
Sometimes, things go a little wrong and your PC simply won’t boot. Even safe mode won’t play ball. What to do? There are a few things you can try before resorting a full reinstall, including third party tools, but one port of call closer to home is the Windows Recovery Console.
The recovery console is part of the Windows CD on XP and 2000, and it’s got some handy features for fixing a number of messups. The most useful fixes include repairing the master boot record (MBR) and bootloader for the OS, which can be broken by viruses, some over zealous partitioning (maybe from installing a second OS), or simply an unexpected error.
What you’ll need
To use the recovery console, you’ll need up to three things:
- A Windows XP installation CD - This will need to be a ‘proper’ unautomated XP CD, and not an installation image or scripted disc like some system resellers provide.
- Basic command line knowledge – We can help you out with that in this guide.
- Disk controller drivers on a floppy disk – If you have any special disk controllers, like certain SATA or RAID controllers, you’ll need the appropriate drivers on a floppy disk. Your motherboard or controller card manufacturer should be able to help if you don’t seem to have a disk.
- Admin password – You’ll need to know the administrator password as the recovery console logs in as this.
That should be it!
Getting to the console
Loading the recovery console is fairly simple. Pop your XP CD into the computer, reboot it and make sure the BIOS is configured to boot from CD before the hard drive. Then, when prompted ‘hit any key to boot from CD’. If you need to load SATA/RAID drivers, hit F6 and have your floppy disk ready, else wait for Windows Setup to load.
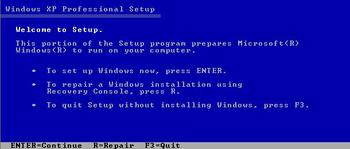
After a minute or so, you should see the above screen. The second option is to repair a windows installation with the recovery console. That’s the one we want, so hit ‘r’. XP setup will then scan the disks it can see and start the recovery console. You have a couple of seconds to hit ‘enter’ to change the keyboard layout, something us Brits may find useful; choose en-GB for the British layout.
The above prompt should now be on screen. This lists all the Windows installations that were found. Only one can be worked on. Lucky for us, we only had one installation, so went with that. You’ll now be asked to enter the administrator password.
Once logged in you’ll get a prompt that looks something like this “C:\WINDOWS>”. Those familiar with MS-DOS will be right at home, but many will not be quaking at the thought of mouse-less PC interaction. Worry not, it’s pretty easy.
Getting the console to do something involves entering a command, along with parameters, then hitting enter. The most important comment to know is “help”. This will list all console commands. You can type “help command” to get help for that particular command, for example “help cd”. Cd is the command to change directories at a prompt, which is useful if you need to find a file and do something with it, like delete a nasty virus.
There are a lot of things you can do at the recovery console, but we’ll cover just four for now.
Chkdsk
If you’ve ever shut down your PC uncleanly, there’s a chance this has run at startup. In fact, running “chkdsk” regularly is considered good house-keeping. However, sometimes Windows will check the disk on every startup, seemingly with no good reason. Sometimes Windows thinks there’s an error on a disk, but can’t find one. Also, if an error occurs in the wrong place on the disk, you might not be able to boot Windows to a point where it can perform a disk check.
Recovery console to the rescue. Running “chkdsk C: /p” will force a check of drive C from the recovery console. Adding a “/r” will also check for and attempt to recover bad physical sectors on the disk.
A disk check from the recovery console can not only get your system booting again, but on occasion, we’ve found, fix errors that the ‘regular’ chkdsk couldn’t find. It is, without a doubt, a very handy tool to have.
Bootcfg
Boot config allows you to view and change the list of Operating Systems that the Windows bootloader will boot. The bootloader is a simple program run before Windows, which lists the available Operating Systems so the user can choose which to boot. In most cases it doesn’t even ask the user, because there’s only one OS available!
I’ve you’ve been reinstalling windows or using more than one hard drive, a configuration change might mess up your bootload configuration. With bootcfg you can scan for and rebuild the list of windows installations. Run “bootcfg” with no parameters and it will list what you can do with it, from listing the current setup to searching for and adding Windows installations to the boot list.
Fixboot/fixmbr
Probably more useful and bootcfg are the two programs fixboot and fixmbr. The Master Boot Record, or MBR, is the first 512-byte sector of your hard drive, in which the partition data is stored. There’s also space for a basic bootloader. When the system starts up, the BIOS executes the MBR, which in turn tends to load data from the boot sector of a partition on the disk.
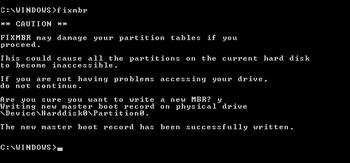
In the case of Windows, the MBR will know which partition the main Windows bootloader (called NTLDR) resides on. However, if a partitioning exercise goes wrong, or the MBR gets corrupted, that information may be lost, or one or more partitions may disappear. Fixmbr rebuilds the MBR, including the disk’s partition table. BE WARNED, however, that in some circumstances fixmbr won’t rebuild the partition table properly, particularly if 3rd party partitioning tools were used. Use it with care and as a last resort.
“fixmbr” with no parameters will fix the mbr of the primary disk, although you can specify another hard drive if you wish. To list the attached hard drives, use the program “map”, which will also give you their device names. Below you can see an image of the output you can expect:
Fixboot works on a similar vein to fixmbr, but works on the system partition of the disk. It will write a new boot sector to the partition, in the event that something’s wrong with it, or if you’ve changed the disk configuration and the boot sector is now on the wrong partition.
To fixboot on the system partition, just run “fixboot”. To specify another partition, use its drive name (like “C:”; use “map” to list them) as a parameter. Below is a screenshot of fixboot in action:
Exercising caution
Using the recovery console means you’re logged in as administrator to the PC. That means all kinds of system changes can be made; we’ve only covered a few here. Some of the changes can have catastrophic circumstances if not done properly. Take heed of our warnings: Don’t mess with bootcfg unless you have reason to believe your boot configuration has changed. Don’t use fixmbr or fixboot if you’re not sure about how your disks were partitioned.
The recovery console can’t fix all errors, but sometimes it’s the quickest way to get things up and running again. Of course, ultimately, if in any doubt, seek help!


